emergence
buy $20realtime granulator with multiple grain streams
Features
- Real-time granulation of the incoming signal
- 4 grain generation streams with independent parameters
- Built-in preset manager with factory presets
- Modulation system with many modulation sources: LFOs, Macros, Audio Input/Output and parameter randomization
- ADSR controls for shaping grain envelopes
- High quality grain pitch transposition (+/- 24 semitones)
- Synchronize time based parameters to host tempo/beat
- Up to 600 grains (depending on your CPU)
- Freeze buffer contents
- Built-in help (hover over controls and see text at the bottom)
- Resizable UI
- Collapsible UI sections to save screen space
- Parameter randomization and locking
- Available in VST3 (windows and mac) and AU (mac only) formats
- Native support for ARM and Intel Macs
Demos
Some of these were recorded with an older version of the plugin. It might look different, but it can still make the same sounds (and much more).
Also check out my youtube channel for more demos!
System Requirements
- Windows 10 / macOS 10.12 or newer
- Host with VST3 support (64-bit)
- OpenGL 3 or higher
If you are using a DAW or system that isn't listed here it is still possible that the plugin will work as expected, however I may not be able to resolve technical issues on such unsupported systems. Please try the free version before making a purchase.
Installation
Windows
Copy the Emergence1.vst3 directory to your VST3 directory. The system default on Windows is: c:\Program Files\Common Files\VST3.
Mac
Run the Emergence1.pkg installer.
This will install both the VST3 and AU formats in the following location:
- VST3: /Library/Audio/Plug-Ins/VST3/Emergence1.vst3
- AU: /Library/Audio/Plug-Ins/Components/Emergence1.component
Troubleshooting
I'm sending midi into the plugin but cannot get it to produce audio
Emergence is not a synth but an audio effect (like regular delay or reverb). It does not process midi in any way and needs audio input to produce sound.
Other questions
If you need help getting the plugin up and running please see the troubleshooting page.
If this does not answer your question feel free to send me an email!
User Manual
Introduction
Emergence occurs when an entity is observed to have properties its parts do not have on their ownproperties or behaviors which emerge only when the parts interact in a wider whole.
A single grain is not that interesting. The most exciting things happen when hundreds of overlapping grains play together, creating anything from complex delay patterns to strange noises to beautiful layered soundscapes.
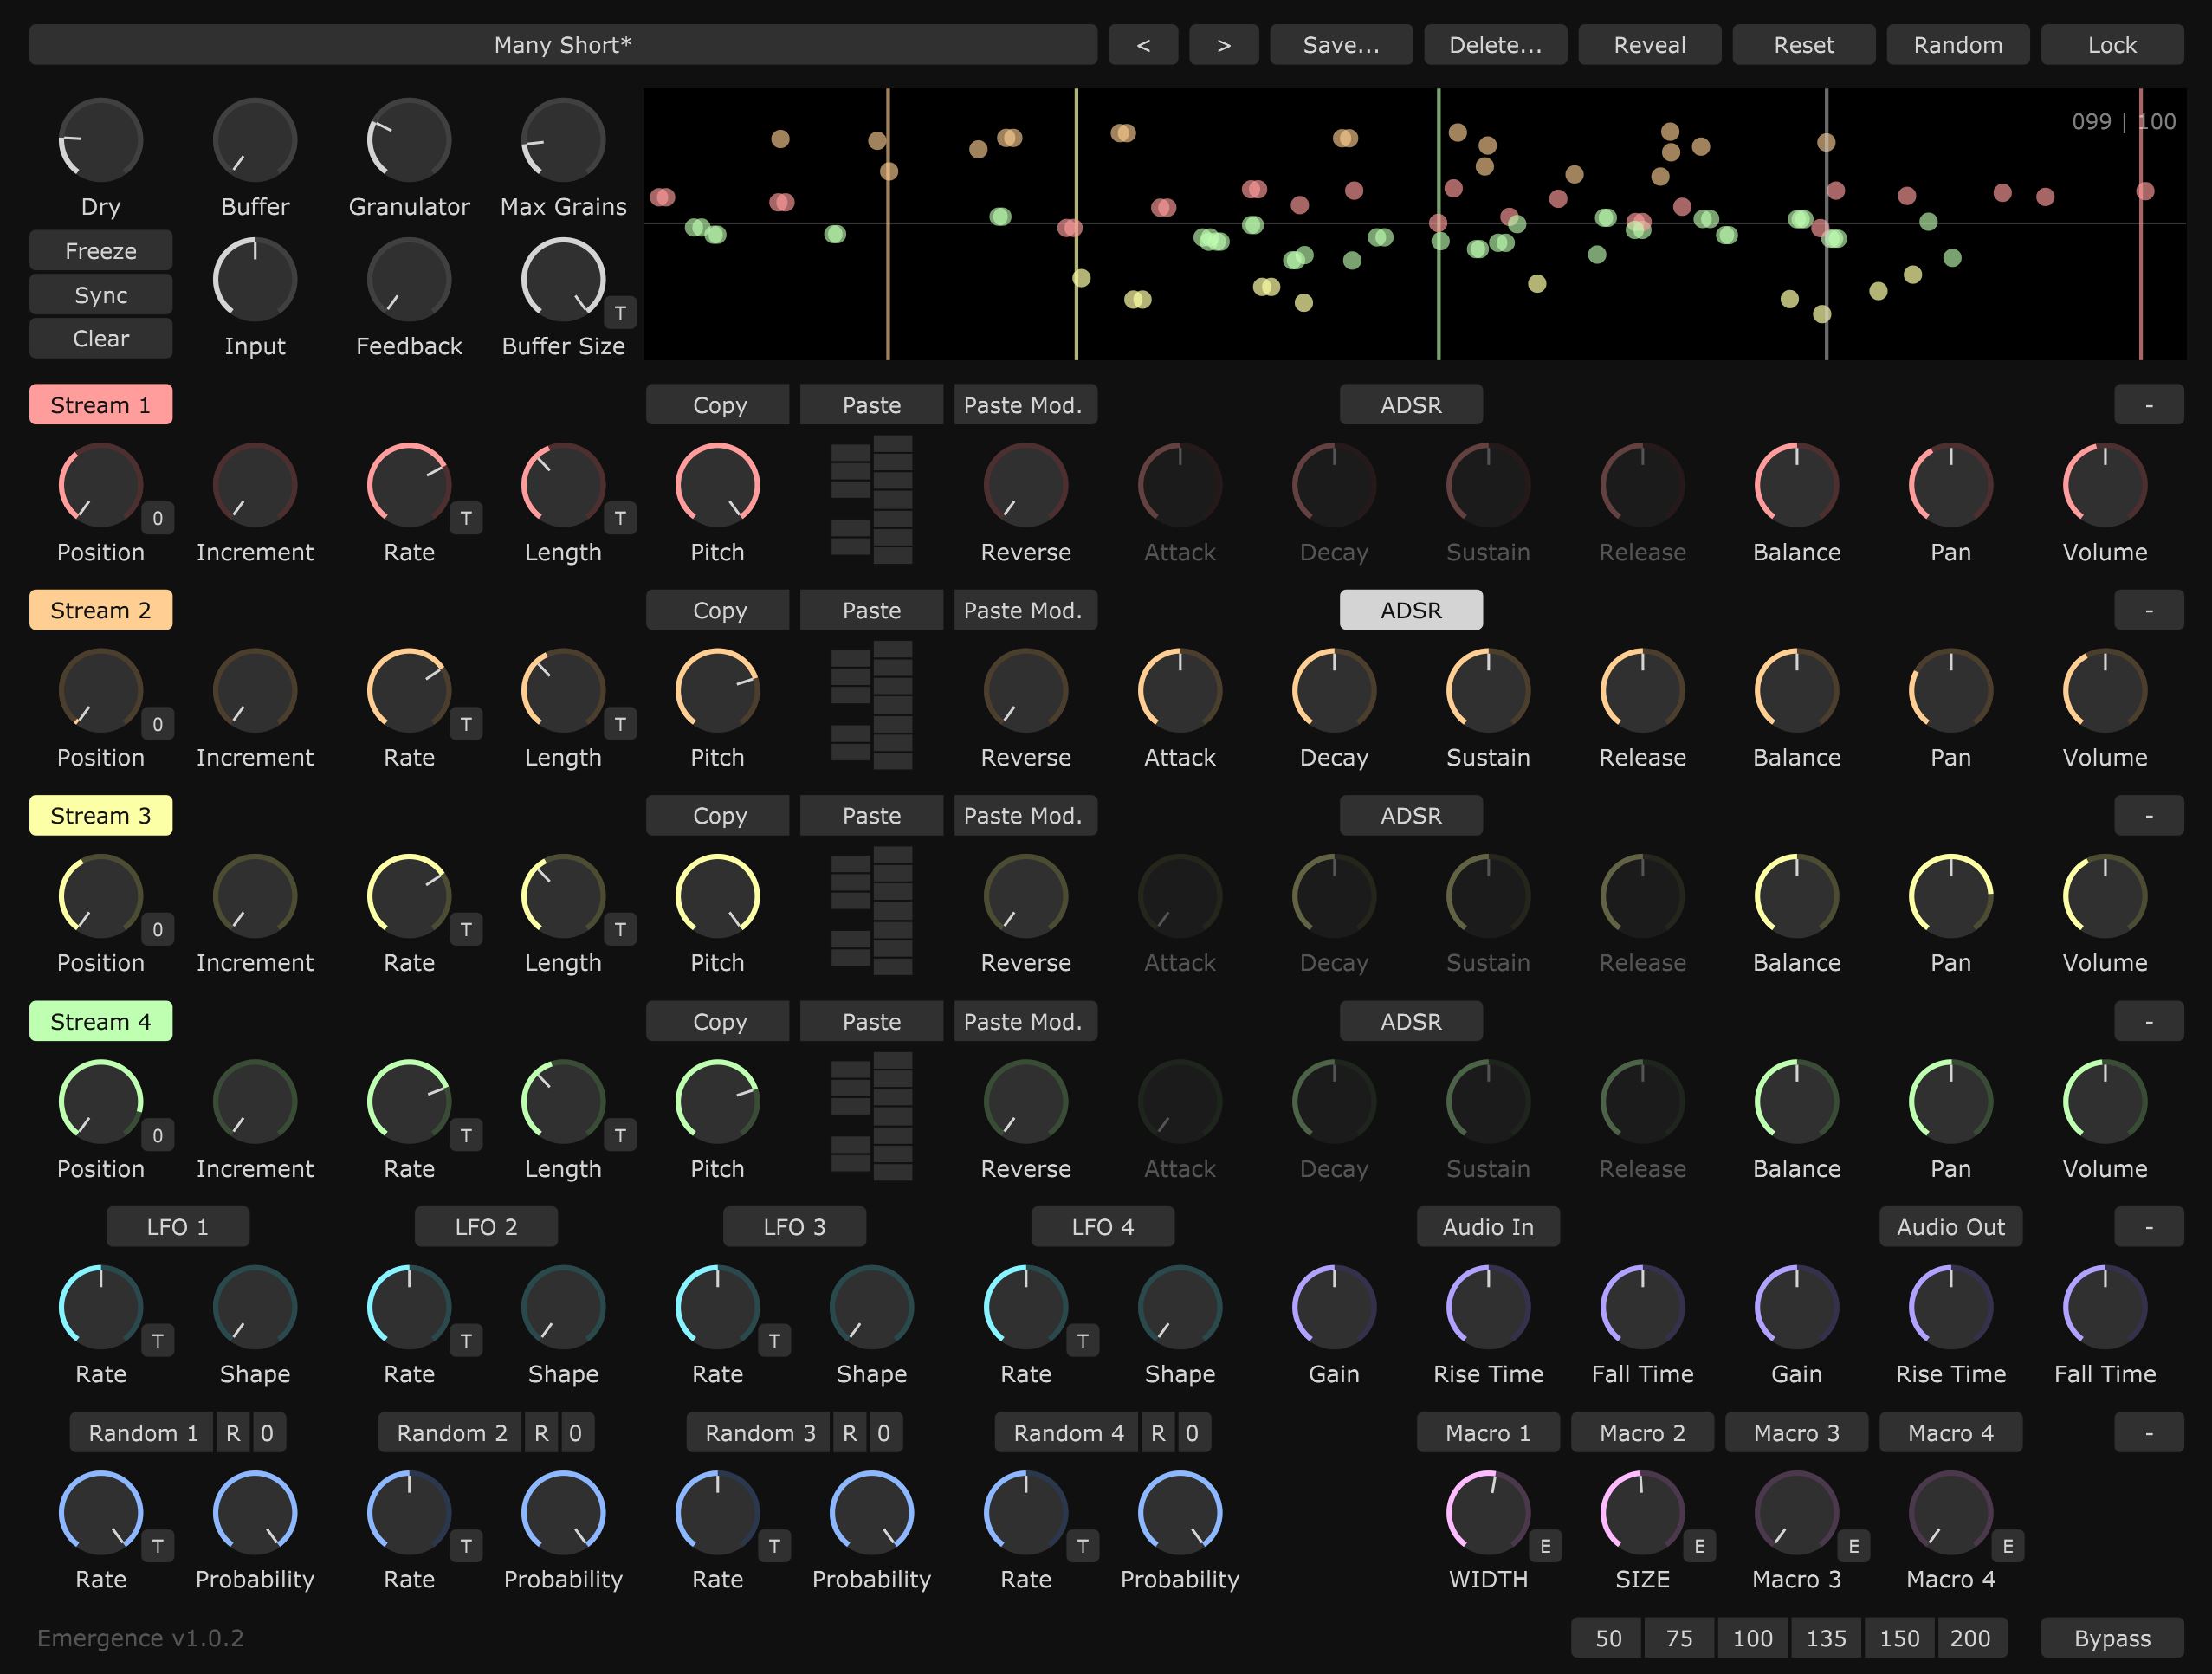
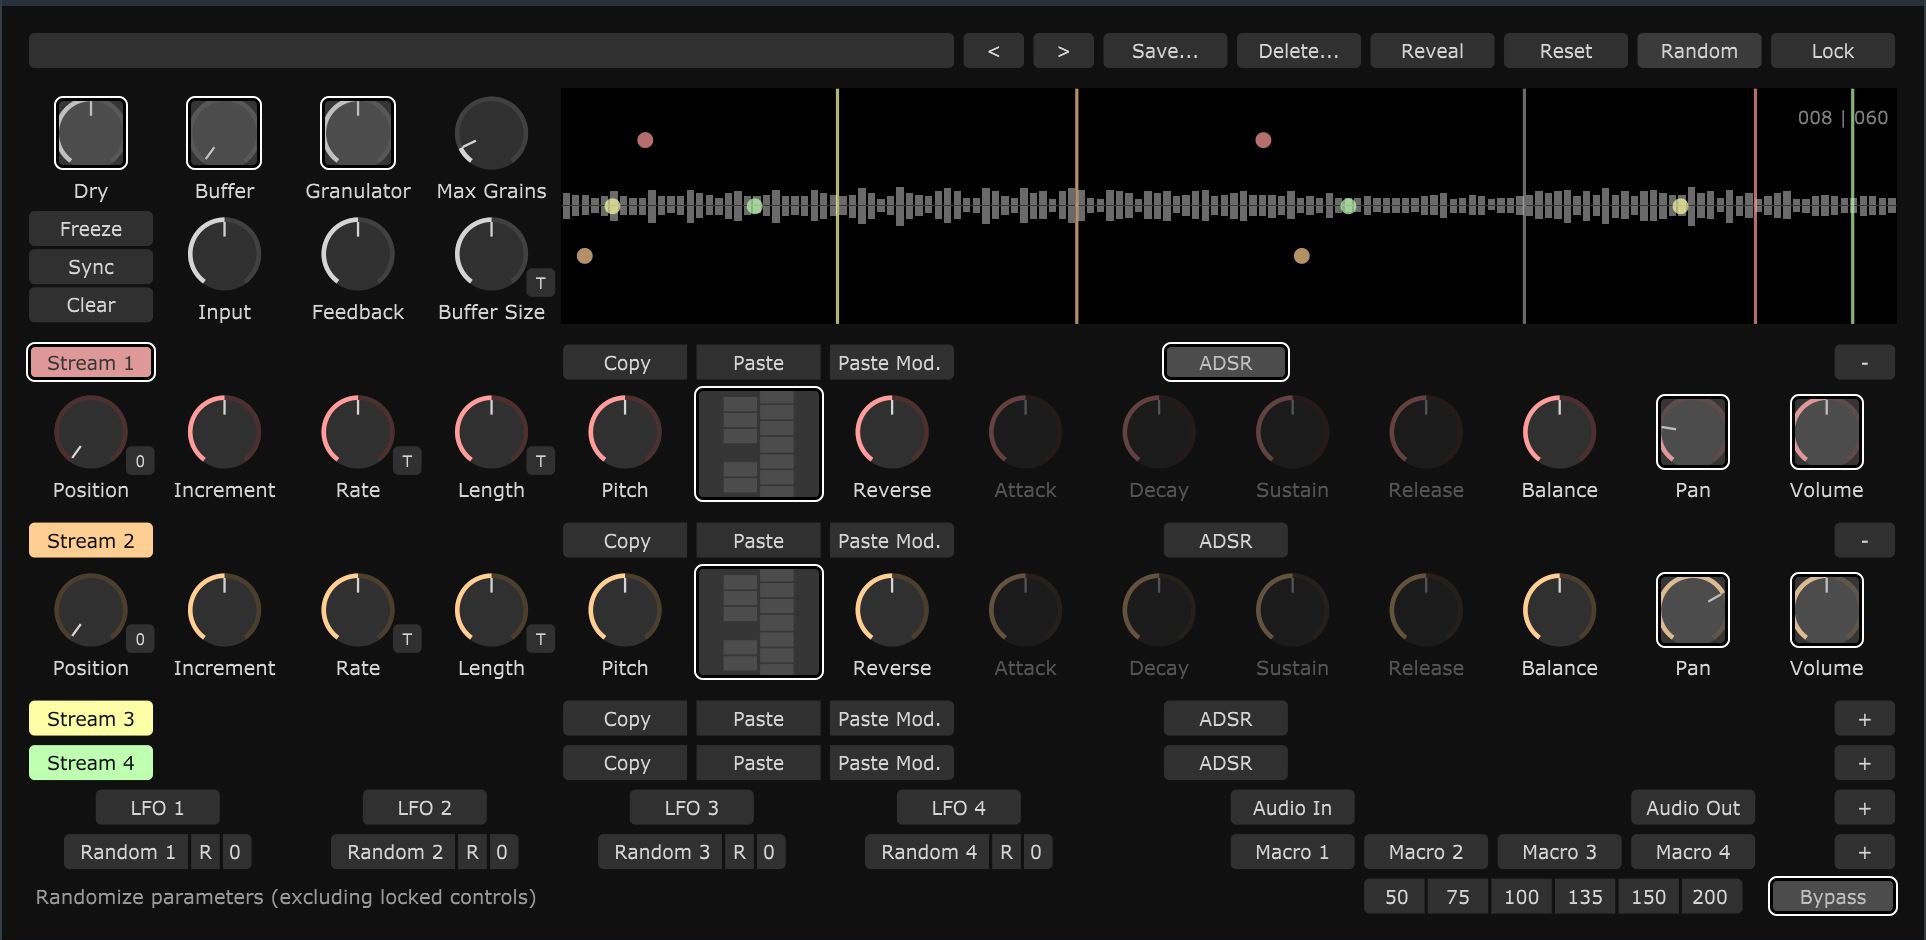
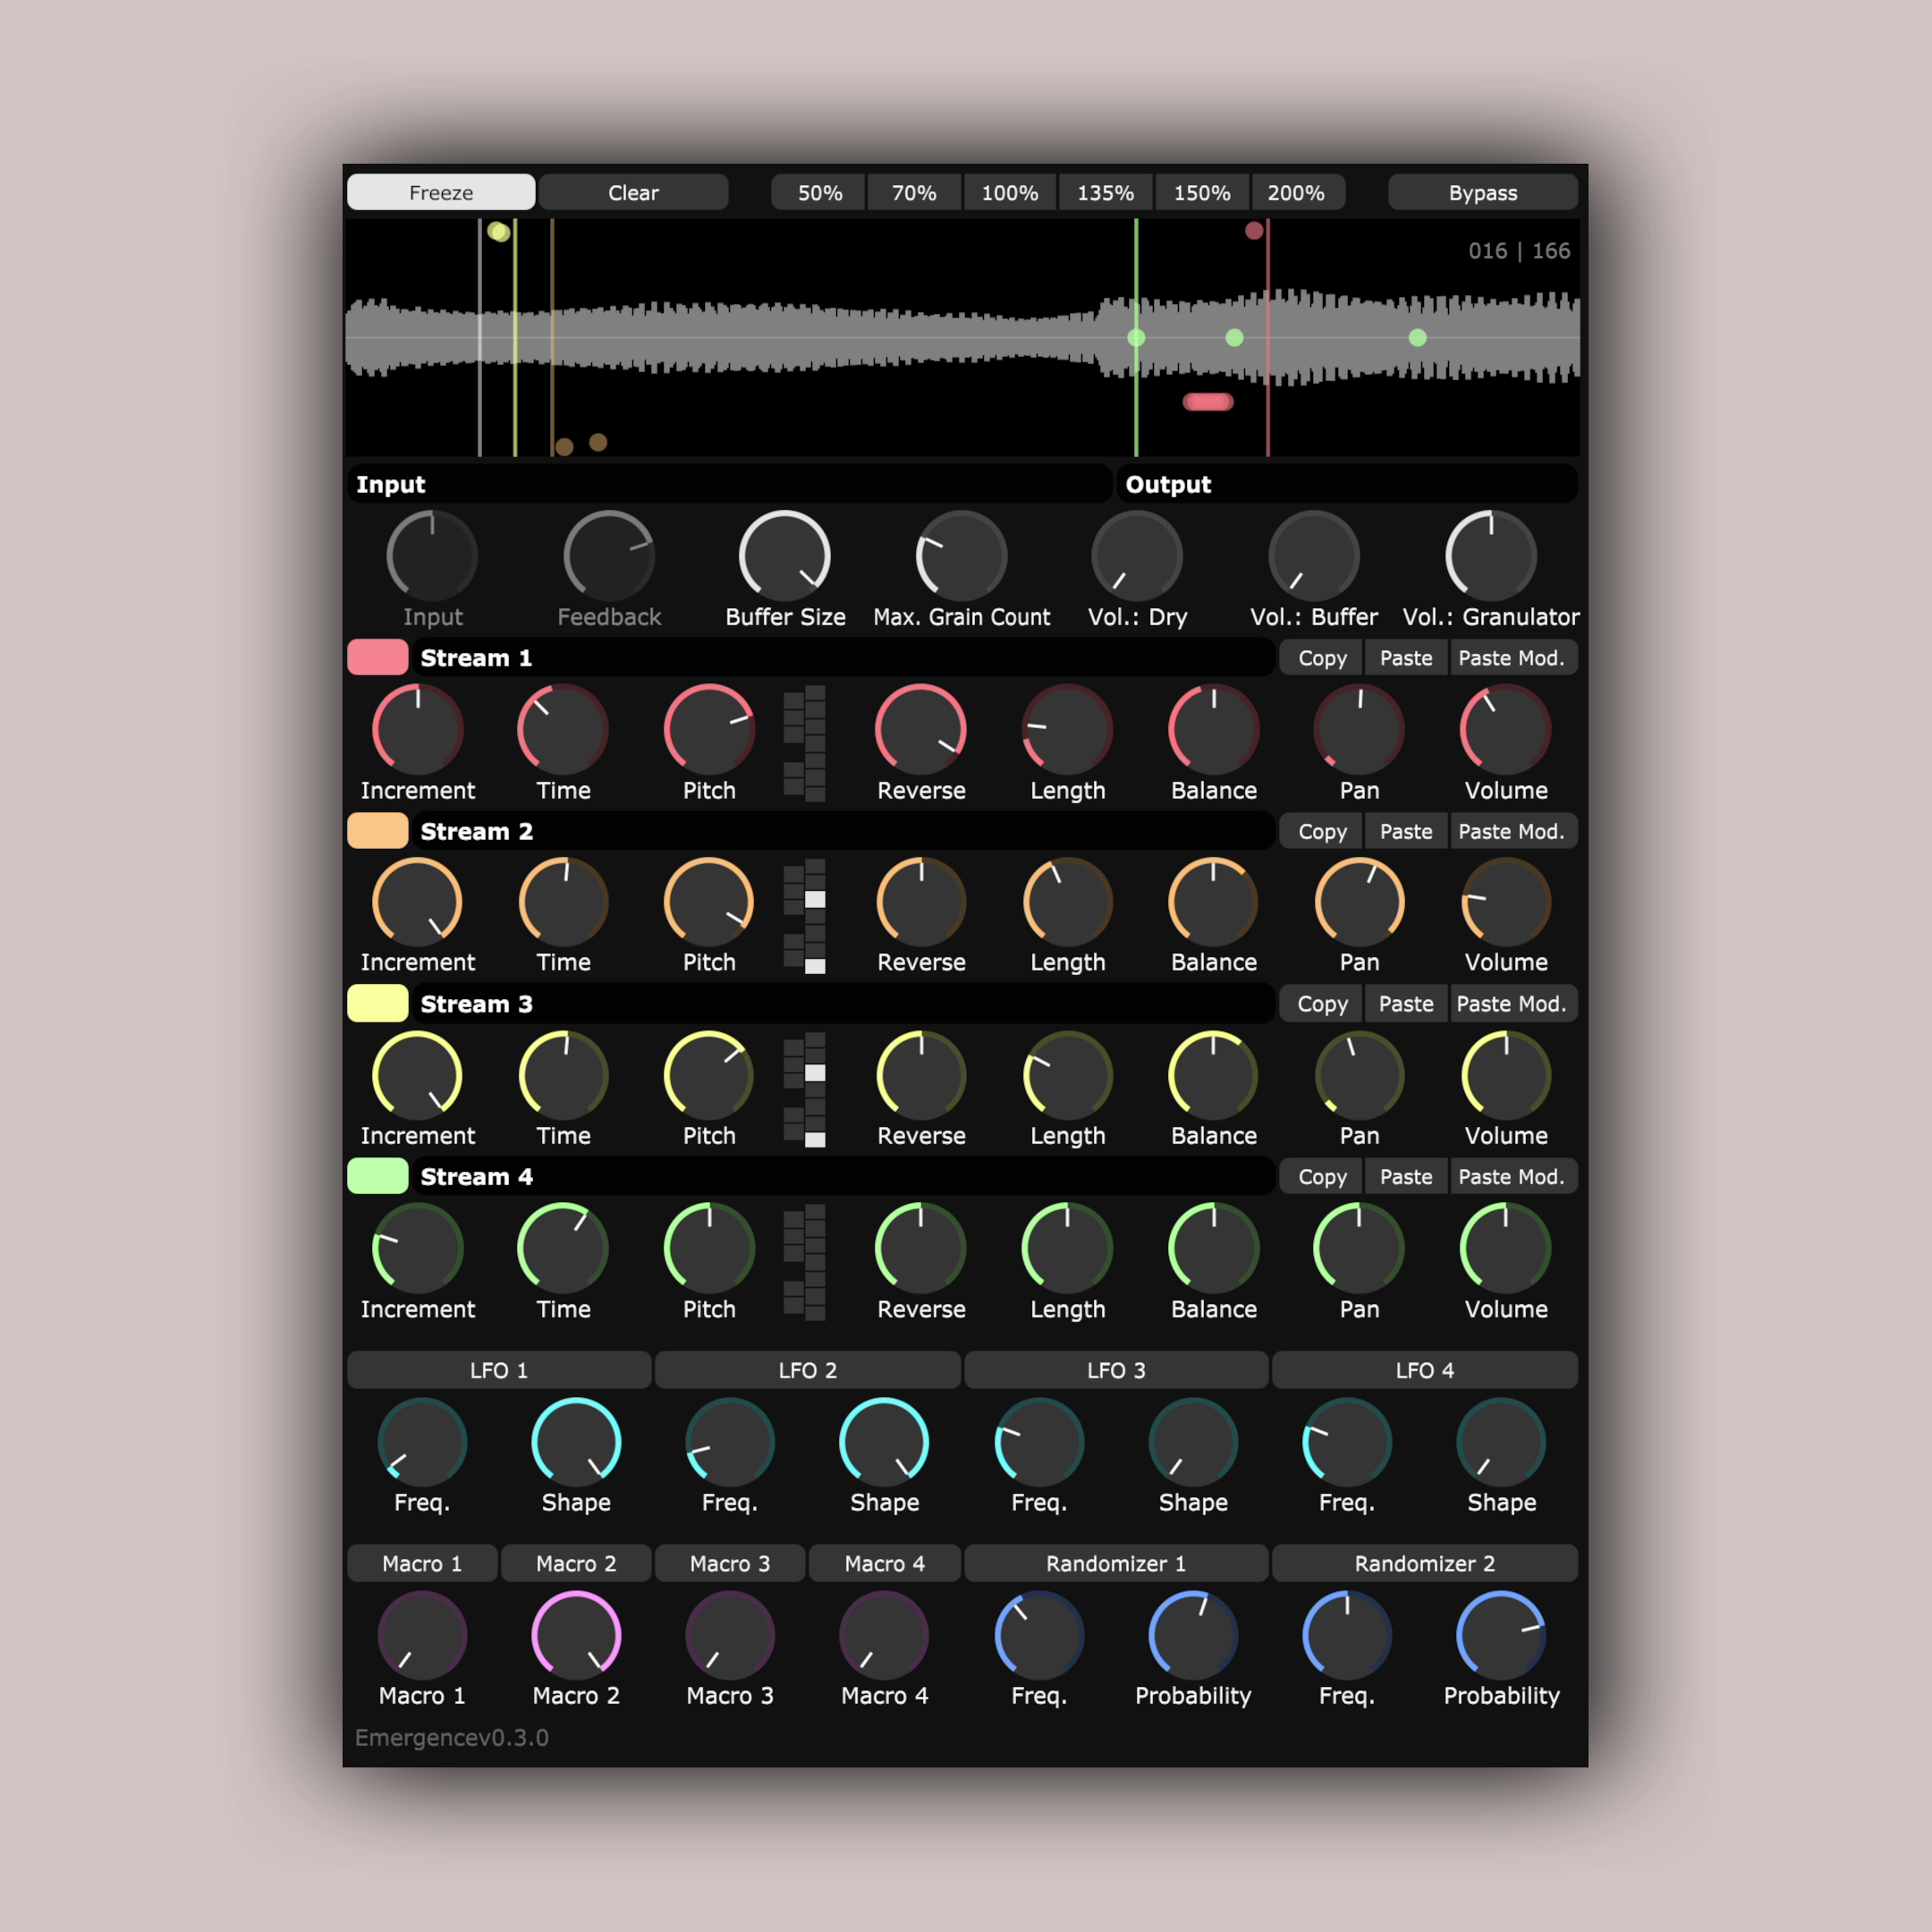
This plugin is a real-time granulator. It continuously records the input signal into a buffer. The content of the buffer is played back as many short pieces of sound called grains. Up to 600 grains can be generated in 4 streams, each having it's own set of parameters that control grain generation.
Granular synthesis 101
Granular synthesis means taking an audio signal - a pre-recorded sample or in the case of Emergence a buffer that is continuously being filled with an input signal - and playing it back in smaller fragments called grains to create unique effects and textures.
New grains are started periodically at an interval (also known as inter-onset time) controlled by the user. The sound produced by each grain is determined by a number of parameters (like length, start position in the source material, pitch, panning, etc.). Each grain also has an associated volume envelope. In its most basic form this means smoothly fading the audio in and out to avoid unpleasant transients but having control over the shape of this envelope can also be a powerful tool for shaping the resulting sound.
While playing a single grain at a time can produce some interesting effects, much more complex sounds can be achieved by playing hundreds of overlapping grains, each shaped by different parameter values.
To create even more complex, layered sounds grains can be generated in multiple streams with the parameters of each stream being independent from the others.
Using the plugin
The plugin interface can be divided into five sections. This chapter will explore each of these from top to bottom.
Presets
Presets let you save the state of the plugin including all parameter values into a file and reuse these settings later (even in a different DAW or on a different machine).
Installing presets
Copy the Factory directory into the preset search path:
- Windows: C:\Users\Username\Documents\Emergence\Presets\
- macOS: /Users/Username/Documents/Emergence/Presets/
To automatically create the preset directory at the correct location, click the Reveal button near the top right corner of the plugin window. This will create the directory and open it in the system's file browser.
Each preset is stored in a file with a .emergence extension. The filename determines the preset name displayed on the plugin UI.
Using the preset manager
All controls at the top row of the plugin are related to presets. The long gray area on the left shows the name of the last loaded preset, marking it with an asterisk (*) if any of the parameters are changed.
Clicking the preset name will open up the preset browser, offering an overview of all available presets. On the left you will find a list of directories containing two entries User and Factory. Any presets saved by the plugin will be stored in the User directory.
Selecting any of the directories on the left will list all the presets in that directory on the right side of the preset browser.
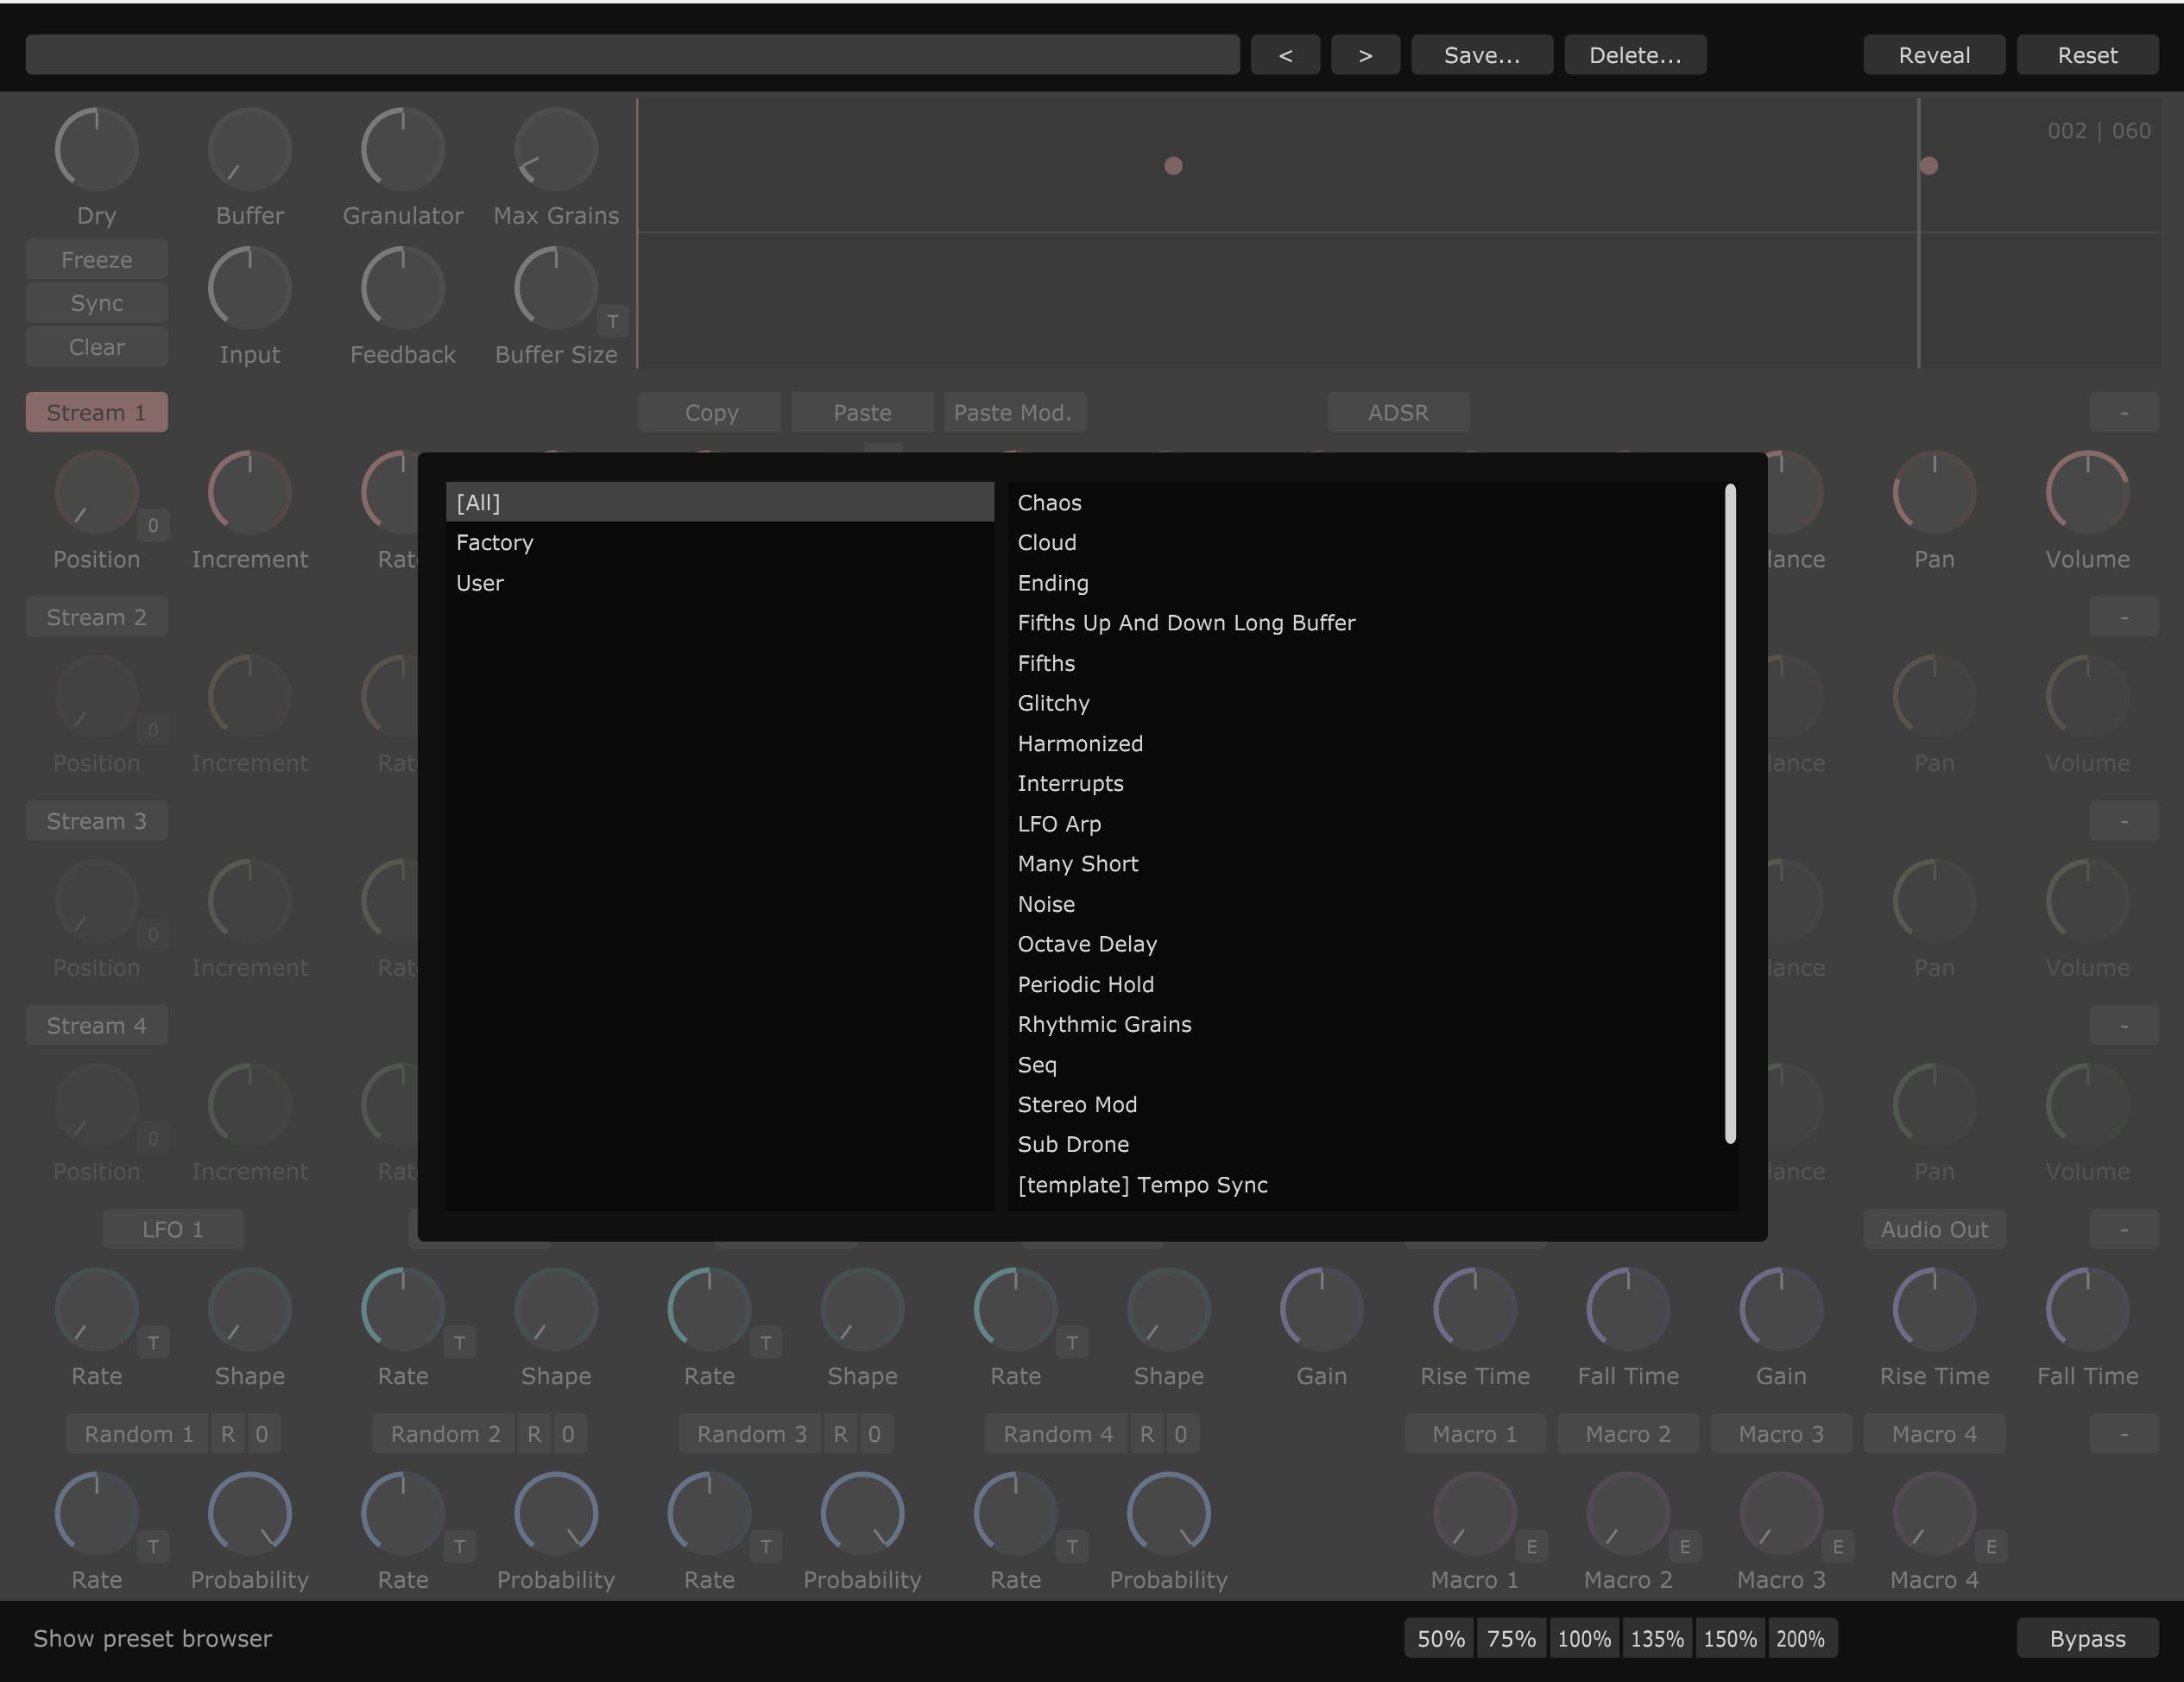
Next, the left (<) and right (>) buttons let you quickly cycle through the presets.
Clicking the Save button will open a dialog for entering a name for the preset. If a preset with the specified name already exists in the User directory, the plugin will ask for confirmation before overwriting the existing preset file.
Clicking the Delete button will open a confirmation dialog before deleting the preset file. Alternatively, you can delete any preset by deleting the corresponding preset file in your system's file browser.
The Reveal button will open the file browser at the location of the last loaded preset file (or the root of the Preset directory if no preset is loaded).
Clicking the Reset button will reset all plugin parameters to their default values and unlock any locked controls (described in Parameter locking).
If you wish to rename a preset, you can save it again with a different name and delete the original, or click the Reveal button and rename the preset file, keeping the .emergence file extension.
Buffer controls and display
The knobs in the top row of this section control the output of the plugin:
Dry
Controls how much of the dry (unprocessed) input signal is added to the output.
Buffer
Controls the level of the current buffer contents.
Granulator
Controls the volume of the grains, affecting every stream.
Max Grains
Limits the number of grains that are allowed to play simultaneously. Turning this down can help limiting the CPU load of the plugin, which can be useful in busy sessions or on less powerful machines.
The knobs and buttons below control how input audio is recorded into the buffer:
Input
Controls the level at which the input signal is recorded into the buffer.
Feedback
Controls how much of the previous contents of the buffer is kept as new input is being written into the buffer. With the feedback at its minimum, new input overwrites any previous buffer contents while at maximum feedback new input is added while keeping existing content indefinitely in the buffer.
Buffer Size
Changes the length of past input stored in the buffer. Changing this knob will clear existing buffer contents to avoid any discontinuities in the recorded signal.
Freeze
With freeze enabled the plugin will stop recording new input samples while keeping any buffer contents indefinitely. (This has the same effect as turning the Input all the way down while maxing out the Feedback
Sync
With sync enabled the write position in the buffer will be locked to the playhead position of the DAW. This can be useful if you want the input played by the DAW to end up at predictable locations in the buffer. On the other hand jumps in the playhead position (due to seeking or looping) might result in clicks and pops being recorded into the buffer. To avoid these side effects it is recommended to keep sync turned off when possible.
Clear
Clears the current contents of the buffer.
Display
On the right you can find an animated display providing feedback about the current buffer contents and all the grains that are currently playing. The numbers in the top right of the display indicate the number of grains that are currently playing as well as the maximum number of grains that can play simultaneously (set by the Max Grains knob mentioned above)
Grains can be generated in 4 streams which are identical in terms of parameters and behavior but can be controlled independently. This makes it possible to create complex layered textures and soundscapes, with each stream contributing to the overall sound in different ways.
Grain generation streams
A stream has a number of parameters that control how grains are generated. Changing any of parameters will not have an effect em any grains that are already playing.
Grain stream parameters
Enable
The enable button (labeled with the number of the stream) turns grain generation on or off for the given stream. Note that this only affects the generation of new grains: any grains that are currently active will continue to play through their prescribed length after grain generation for a stream is turned off.
Position
Controls the starting position of the grains within the buffer (indicated by vertical lines on the display). The grain start position is also affected by the Increment knob (see below). If you wish to sample a specific part of the buffer, set Increment to 0.0 and click the 0 button to clear any offset added by a non-zero increment value.
Increment
The rate at which the grain start position (indicated by vertical lines on the display) moves forwards or backwards along the length of the buffer.
Rate
Controls the rate at which new grains are generated.
Length
Changes the duration of the grains.
Pitch
Changes the pitch of the grains (relative to the pitch of the source audio), ranging from -2 to +2 octaves (-/+ 24 semitones). The buttons on the right of the Pitch knob can be used to lock pitch changes to specific intervals. Engaging the button at the bottom for example will snap the pitch value set by the knob to the closest octave.
Reverse
Sets the probability of a grain playing in reverse. At 0.0 all grains will play in the normal forward direction, while at 1.0 every grain will play backwards.
ADSR
Enables the ADSR (Attack - Decay - Sustain - Release) envelope on each grain, with the length (relative to the full length of the grain) of each phase controlled by the knobs below. With ADSR off a simple symmetric envelope is used to smoothly fade the grains in and out. When the mouse is positioned over the ADSR button (or any of the associated knobs) the display will show the shape of the envelope.
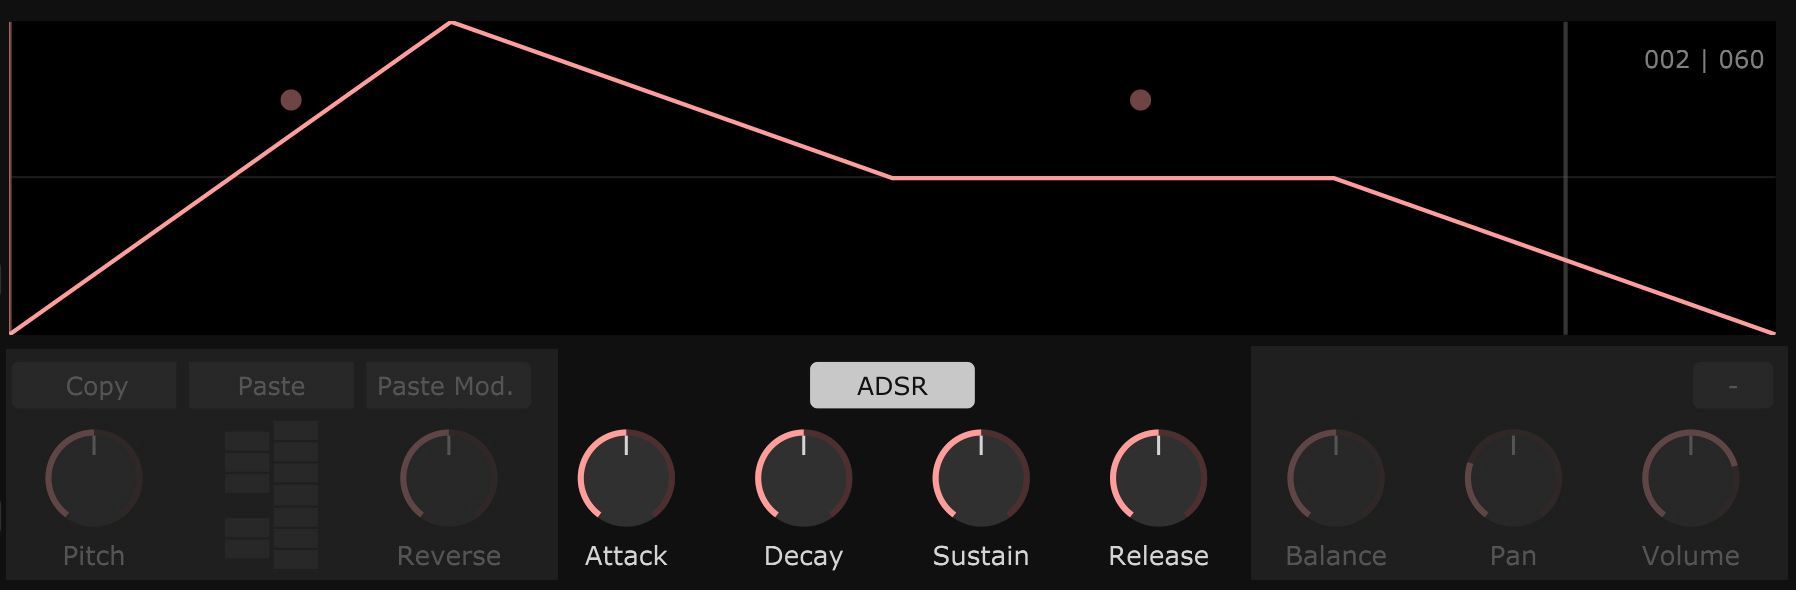
Attack
Controls the amount of time it takes for the envelope to reach its loudest point.
Decay
Controls how quickly the volume falls down to the sustain level.
Sustain
Controls the level of the envelope between the Decay and Release phases.
Release
Controls the amount of time it takes for the sound to fade out at the end of the grain's duration.
Balance
The plugin records the input signal into a stereo buffer. The Balance knob controls the ratio of the left and right channels of the input signal in the grain output. The two channels are visualized on the display with the top and bottom half of the waveform showing the left and right channels respectively.
Pan
Positions the grains in the stereo field. The pan position of each grain is visualized on the display: grains panned to the left will be shown in the upper half of the display while grains panned to the right will occupy the bottom half.
Volume
Controls the level of the grains. Louder grains will appear brighter on the display.
Parameter clipboard
The parameters of any grain stream can be copied to another stream using the copy and paste buttons above the knobs for the stream.
Copy
Place a stream onto the clipboard. Note that the clipboard only keeps track of which stream to copy, the parameter values of the source stream will be read when the stream is pasted.
Paste
Paste the parameters of the previously copied stream. Modulation (explained later) on the target stream is not affected, only the parameter values are copied.
Paste Mod.
Paste the parameters of the previously copied stream, including modulation. Existing modulation on the target stream parameters will be replaced.
Modulation system
The plugin has a built-in modulation system which can be used to add movement, create evolving sounds or randomize parameters and discover new and interesting settings. Instead of directly influencing grain generation and audio processing, the modulation system acts on the parameters discussed in the previous section.
The modulation system has three key components: Modulators, target parameters and modulation assignments. In short, Modulators produce a control signal that can modify the values of target parameters (any knob on the plugin interface). How a modulator will exactly modify any of the target parameters is determined by the properties of the modulation assignment between the two.
The following section describes each part of the modulation system in more detail.
Modulators
Modulators produce a control signal that can be used to modify parameter values. The plugin has several different modulators:
LFO
LFOs (Low Frequency Oscillators) produce a periodic waveform that oscillates at a rate set by the Rate parameter. The Shape one of the following waveforms: sine, triangle, square, ramp up, ramp down or noise.
The plugin has 4 LFOs that are controlled independently but are otherwise identical.
Random
Randomizers generate a signal that jumps to a new value periodically. How often the change might occur can be controlled by the Rate knob. The Probability parameter controls how likely it is that the output will change to a new value: at 1.0 a new (random) value is produced at every period while at 0.0 the randomizer will keep it's current output value indefinitely, regardless of the current Rate.
Unlike LFOs, Randomizers produce a different output value for each parameter they are assigned to.
Randomizers also have two buttons above the knobs, labeled R and 0.
Clicking the R button will force the randomizer to produce a new output value immediately, regardless of the value of the Rate and Probability parameters.
Clicking 0 will clear the output of the randomizer, resetting it to its neutral value so it does not contribute to the value of any assigned parameters (until the next randomization occurs).
The plugin has 4 randomizers that are (just like LFOs) controlled independently but are otherwise identical.
Audio in/out
Emergence has two modulators that are controlled by the audio signal at the plugin's input and output.
Audio In
Produces a control signal based on the level of the dry, unprocessed signal at the input
Audio Out
Produces a control signal based on the signal at the plugins output.
Both audio-driven modulators have the same three parameters:
Gain
Changes the level of the signal measured by the modulator and can be used to control how sensitive the modulator is to the source audio.
Rise Time
Controls how quickly the output of the modulator reacts to an increase in the level of the source audio.
Fall Time
Controls how quickly the output of the modulator reacts to an decrease in the level of the source audio.
Macros
Macro parameters can be used to control multiple parameters with a single knob. The output of these modulation sources are determined directly by the position of the macro knobs.
The plugin has 4 macro knobs near the lower right of the modulation section. Each macro knob has an associated Edit (<b>E</b>) button that can be used to edit the label of the macro parameters. Custom macro names are saved automatically as part of the plugin state. To reset a custom name click the E, delete any text from the field and hit enter.
Target parameters
Target parameters are all the plugin parameters that are controlled by a knob. Parameters controlled by toggle buttons (such as Freeze or ADSR) cannot be modulated.
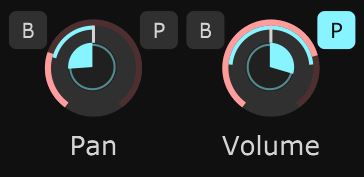
Modulation assignments
A modulation assignment is a connection between a modulator and a target parameter. Each such connection also has its own set of parameters:
Modulation amount
Controls how much a parameter is affected by a modulator. If it is set to a negative value then the value of the parameter will decrease as the output of the associated modulation source increases.
Polarity
Modulation polarity is controlled by the P button near the upper right corner of the associated parameter knob. With the P button engaged the modulation is bipolar, meaning the modulated parameter value will oscillate symmetrically around the base value set by the parameter knob. In unipolar mode (with the P button off) the modulated value will change in only one direction form the base value, depending on the sign of the modulation amount.
Bypass
The B button near the upper left of any knob can be used to temporarily bypass any modulation without deleting it.
The maximum number of modulation assignments is limited to 64.
Using the modulation system
To create a new modulation, click the button (labeled with the modulator type and number) above a modulator to arm the modulator. A smaller knob will appear over every knob that can be modulated, which will control the modulation amount. Simply drag the modulation amount knob over the parameter you would like to modulate. Now with a modulation created two buttons will appear next to the modulated knob that can be used to switch between unipolar and bipolar mode or bypass the modulation. To delete a modulation, select a modulator and double-click the modulation amount knob for the connection you would like to remove.
Moving the mouse over any of the modulator buttons will display the modulation amount knobs for all parameters that are currently being modulated by that source. Conversely, moving a mouse over any knob (when none of the modulation sources are selected) will highlight the modulators that are currently assigned to the hovered parameter.
Parameter locking
(since v1.0.2)
Parameter locking makes it possible to prevent some buttons and knobs from being changed when loading presets or when using the built-in parameter randomization feature.
To lock a parameter, click the Lock button near the top right corner of the plugin window to activate parameter locking, then click any parameter control to toggle locking. Locked controls will be highlighted with a white border and overlay. (Controls cannot be changed with the mouse while the Lock button is active.)
The list of locked parameters is saved by the DAW when saving projects or presets (but not stored in preset files created by the built-in preset manager).
Parameter randomization
(since v1.0.2)
Parameters can be randomized by clicking the Random button near the top right corner of the plugin window. This can be useful for finding new sounds or exploring variations of existing presets.
Clicking the Random button will set every control to a random value. To prevent individual controls from being randomized, use the Lock button described in Parameter locking.
While clicking the Random button will randomize parameters of existing modulations, it will not create new modulations or delete them.
Built-in help
At the bottom left corner of the plugin window, you will find the plugin name and the current version number of the plugin. When the mouse cursor moves over an interactive UI element, this text will be replaced with a short help text about the control under the mouse.
UI scaling
The buttons labeled 50%..200% will change the scale factor of the plugin interface. The resulting scale factor may be limited to fit the size of the display. The scale factor is set globally, meaning that it will be applied to all instances of the plugin (even in different sessions or projects).
Bypass
Bypass With the Bypass button engaged, the plugin will stop processing audio and just pass the incoming signal through.
Tempo sync
Tempo sync allows you to synchronize time-based parameters to the host application bpm/beat.
Each applicable parameter has a button labeled T near the lower right of the associated knob. Clicking this button will reveal a popup menu listing all possible timebase units for setting the parameter value. The value of the parameter acts as a multiplier of the selected timebase unit. For example setting the grain Rate knob to 0.5 with the 1/8 timebase selected will start a new grain at 1/4 note intervals, depending on the bpm of the project.

Some knobs also have a Sync parameter with two possible values:
Beat
Beat will lock the phase of the parameter to the beat position provided by the DAW. This can be used to ensure that event such as grain generation happen on the beat, or to always get the same output an LFO when starting playback from a given position on the timeline.
Free
Free will take bpm information from the host but ignores playhead position. For example the output of an LFO will change without interruption even when the playhead is moved to a different position.
Usage tips
The plugin has a number of features that aim to make interaction easy and frictionless.
Knobs
Knobs have a couple of small features that can help speed up your workflow:
- Double click any knob to reset it to its default value.
- Click the label under any knob to enter the desired value as text. (Entering text values for modulation amount knobs is currently not possible.)
- Knobs can be adjusted by dragging or with the mouse wheel.
- Hold down Ctrl/Cmd for velocity-sensitive mode when dragging a knob. In velocity-sensitive mode, the sensitivity of the knob depends on the speed of the mouse movement, allowing the user to make more precise changes with slower mouse movements.
The small white line on the knob always shows the value of the associated parameter. This is the value saved in presets and seen by the DAW when reading or writing automation.
Another value associated with the knob is its effective value, indicated by the bright arc around the outer edge of the knob. This might show a different value then the base value mentioned above either due to modulation or some kind of restriction on the parameter value. An example of such restriction would be setting the buffer size to 4 bars at a very low bpm: The maximum memory allocated for the buffer might not be long enough to hold 4 bars at the given tempo, so the actual buffer size will be smaller. The audio processing done by the plugin is always controlled by this value.
Collapsible sections
Click the -/+ buttons on the right side of the plugin window to collapse or expand the associated row. This can be useful for reducing the amount of screen space taken up by the plugin, especially when only using a smaller subset of streams and modulators.
Right-click context menus
Right-click any parameter control (button or knob) to reveal options related to the parameter. This can be helpful for finding out parameter names when setting up automation, or accessing functions like midi learn. Please note that the availability and contents of this context menu will vary depending on your DAW.

emergence v0.3
freeThe older v0.3 version of the plugin can be downloaded for free, with the option to donate an amount of your choice.
This version is already a quite capable granulator, offering the same core functionality and quality as the paid version, it does however lack the latest features introduced with the v1.0 release, including:
- ADSR controls for shaping grain envelopes
- new modulators: Audio Input/Output
- Synchronize time based parameters to host tempo/beat
- Parameter randomization and locking
- Built-in preset manager (and a couple of factory presets)
- Position knob to control gain start position
- Collapsible UI sections to save screen space